
iRegatta Users Manual - Android
This manual may not always be up to date with the latest version of iRegatta available in
Googles Play store, as minor additions or bug fixes may be published
without updating the manual, or slightly out of sync with updates to the manual.
The Android version of iRegatta will no longer get additional features, while development continues on iOS, but bug
fixes will still be made. Most screenshots in this manual are from the iPhone version. Android versions may be slightly different.
This version of the manual was updated for version 3.66.7 of iRegatta for Android.
© Let’s Create, 2015
History
iRegatta version 1.00 was available in Apples App store in November 2009. It started out
as a simple app taking advantage of the internal GPS in the iPhone, to show a subset of
todays race and start view. Main focus was on the essentials like course and speed, notice
wind shifts and get a good start.
Ever since it has evolved, and more advanced features have been added, taking advantage
of NMEA input from other boat instrument, if you have the hardware to broadcast these
data over WiFi.
Since November 2011 an Android version has also been available, and within the first half
year the Android version was up to the same level as the iOS version.
Table of Content
- Overview
- True/Magnetic Compass and correction
- Help View
- Race View
- Configure readouts
- BIG-mode
- Damping
- Lift indicator
- Speed and VMG history
- Performance bar
- Improve your VMG
- Chart plotter
- Laylines
- Configure readouts
- Start View
- Wind View
- Wind History Graph
- Navigation View
- Course View
- Waypoint and Route administration
- Temporary Waypoints
- Statistics View
- Import/Export
- Polar Trim
- NMEA View
- Wind Instrument
- AIS view
- iRegatta In-App purchases
- NMEA setup
- Bluetooth Low Energy setup
- Calculations
- NMEA sentences
Overview
This manual will take you through the features in all the different views of iRegatta,
explaining in detail how it works, how data are generated and how to use them.!
Navigation
Navigation through the main views of iRegatta is done by swiping your fingers cross the
screen to slide through the views.

At the bottom of each view there is a page indicator showing you with small dots where
you - except these sliding views are in two levels.
The names in the shown view-overview will be used in this manual.
Some views have buttons that will take you to other view for actions like choosing
waypoints from a list or importing polar diagrams.
All views are presented in landscape mode.
Settings
Along with many features comes many settings to customize iRegatta
to your exact needs.
The settings for iRegatta can be accessed from the Help view.
Not all settings are of interest, especially not if you don’t have your
device connected to other boat instruments over a WiFi connection or
Bluetooth.
We’ll go through all these settings when we go through the features
they affect, but let’s start off with the two first sections that are about
the display colors and the units.
You can choose to display text and graphics in white on a black
background or opposite. The white background seems to be working
best in bright sun light.
Speed units are self explaining and distance units are used when
distance to the starting line is calculated and presented to you in the
start view.
You can also configure iRegatta to use the Text-To-Speech
feature, to read your Race view readouts and start countdown to you.
General View features
In the top left corner you’ll see a colored dot. This shows you how
recent the latest position update from your GPS source has been.
 GREY - no position update received.
 BLUE - updated less than 2 seconds ago.
 GREEN - updated less than 5 seconds ago.
 YELLOW - updated less than 10 seconds ago.
 ORANGE - updated less than 20 seconds ago.
 RED - updated more than 20 seconds ago.
Right next to the indicator, a number shows the accuracy reported by your GPS source.
Screen lock
At the top middle of the view you’ll see a little lock. This is used to activate or deactivate
the screen lock. If it’s grey, the screen is not locked, if it’s red, the screen is locked.
 Slide the grey lock to the right to lock the screen.
 Slide the red lock (when locked) to the left to unlock the screen.
When the screen is locked, it will not react to any tapping or sliding on the screen.
In the iRegatta settings, there is a section at the bottom called “Auto lock”. If you activate
this, iRegatta will automatically enter screen lock if there has been no user interaction
within a configurable amount of seconds.
True/Magnetic Compass and correction
North on a magnetic compass isn’t North all over the world. There are local variations in
the magnetic field, and it can be quite different from place to place. On top of that the
variation changes over time. If you search the web for “Magnetic variation calculator”,
you’ll be able to find a few web pages that can calculate the values for your location.
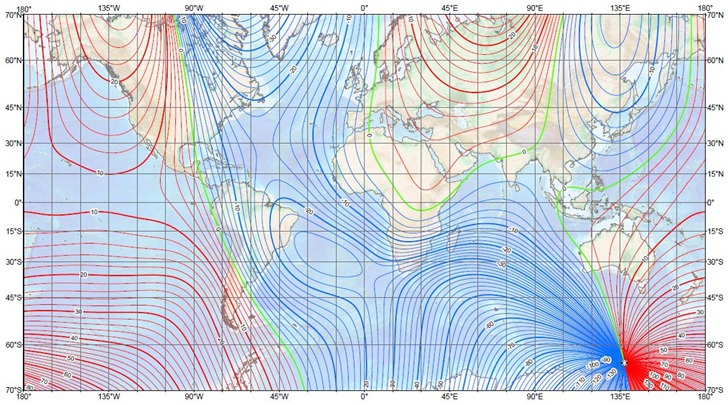
For the better understanding we will look at this sample. At the current position there is a
magnetic variation of 17 degrees East. This means that when your compass shows 0
(North), you are actually heading 17 degrees true.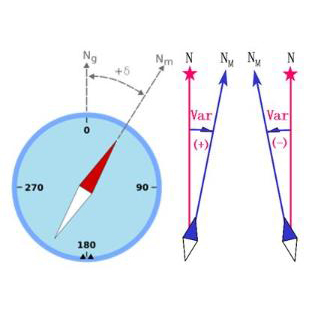
All internal calculations in iRegatta are done
with true headings, so if you choose "Magnetic"
in the settings, a conversion of input and output
will be made.
In the sample above, you should type in a
correction value of 17. If the magnetic variation
had bin 5 degrees West, the value would have
been -5.
Two types of conversions are made in iRegatta when Magnetic is chosen in the settings:
- RemoveVariation - this converts a compass heading to true heading by adding the
correction value from the settings. In the sample that means if your compass shows 0, this
conversion will add 17 to make it true heading. - AddVariation - which is the opposite. If iRegatta has calculated a bearing to next
waypoint of 17 degrees, it'll subtract the correction value to display what magnetic course
to steer, in this case 0 (north).
For manual input, we
need to convert to true with the RemoveVariation conversion. This goes for:
- Manual input of wind direction.
- Bearing in waypoint by bearing and distance.
- Bearings.
When outputting data, we need to convert back to Magnetic. For consistency all
calculations in iRegatta are done on true values, so we only convert the numbers for
display. Here're the outputs that are affected if magnetic is chosen in the settings:
- Bearing to next waypoint in the navigation view
- Bearing of next leg in the navigation view
- Bearing, if chosen in the readout, in the race view
- wind direction in the lay line view
- Bearing in the lay line view
- the two lay line directions in the lay line view
- the start line bearing in the start view
- wind direction in the Wind View
- Starboard tack in the Wind View
- Port Tack in the Wind View
- Wind direction in the Wind History view
There are NMEA sentences for Compass Heading True and for Compass Heading
Magnetic.
If you choose Magnetic in the iRegatta settings, the NMEA sentences for True will be
ignored and only the ones for Magnetic are used. In case only sentences with True are
received, Magnetic will be calculated from True, using the correction value you typed in
the settings. The same goes the other way around if True is chosen in the iRegatta settings.
Also COG will be converted to Magnetic heading instead of true if you choose Magnetic in
the iRegatta settings.
Help View
In the help view iRegatta is showing you version information, contact information and a disclaimer.
When ever you update iRegatta from Google Play, iRegatta will show this view
when launched the first time.
If you tap the “i” icon in the top right of the view, a pop-up view will show you the added features
of the latest update. You'll get a list of changes for all previous version.
On Android this is also the view from where you can access the settings for iRegatta.
From the Help View you can also start and stop the connection to bluetooth peripherals like
the Pebble smartwatch or Bluetooth Low Energy (BTLE) anemometers like CUPS 4.0.
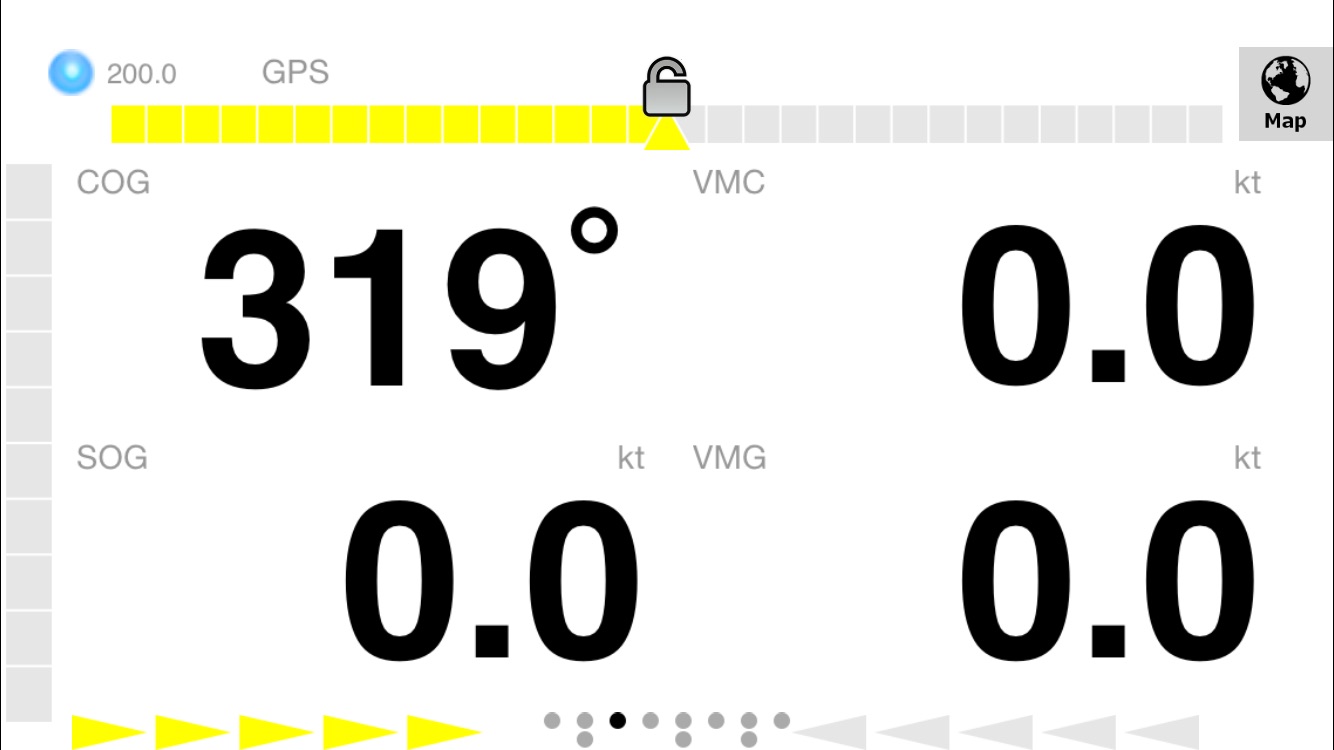
Race View
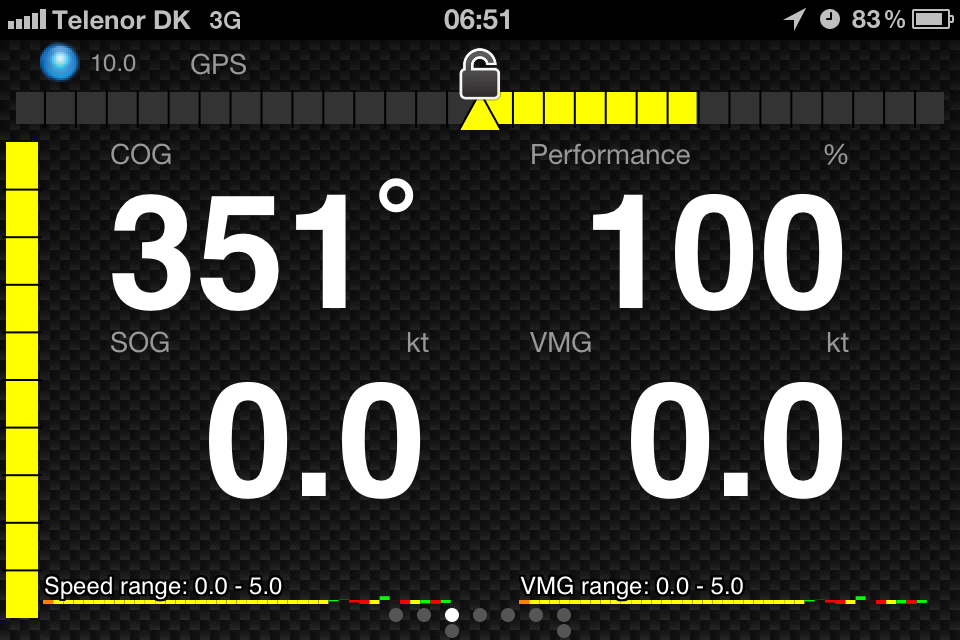
The race view is considered the main view of iRegatta, this is probably the view you’ll use
the most while racing, to show you what’s going on and how you are performing.
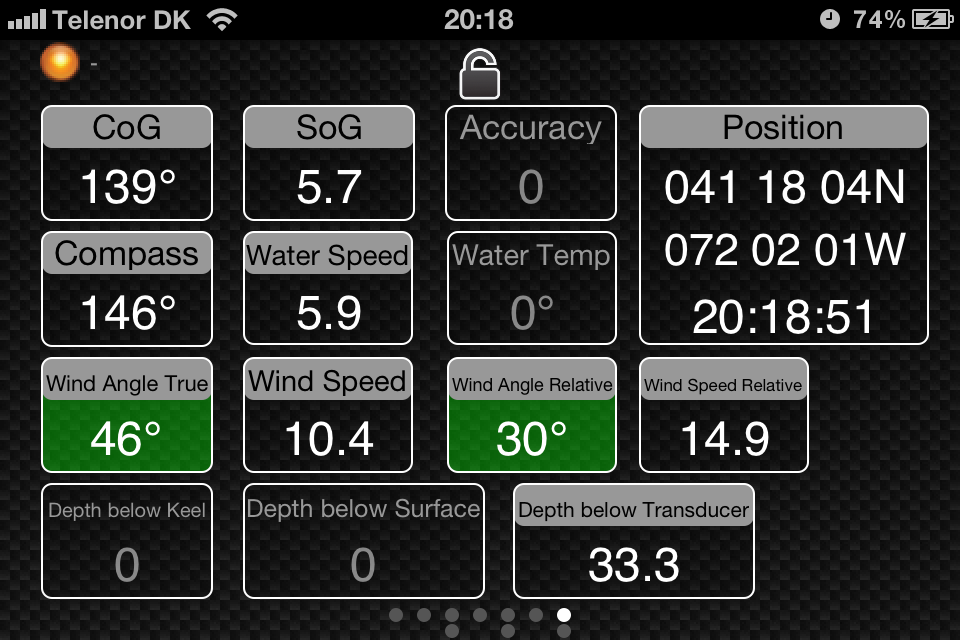
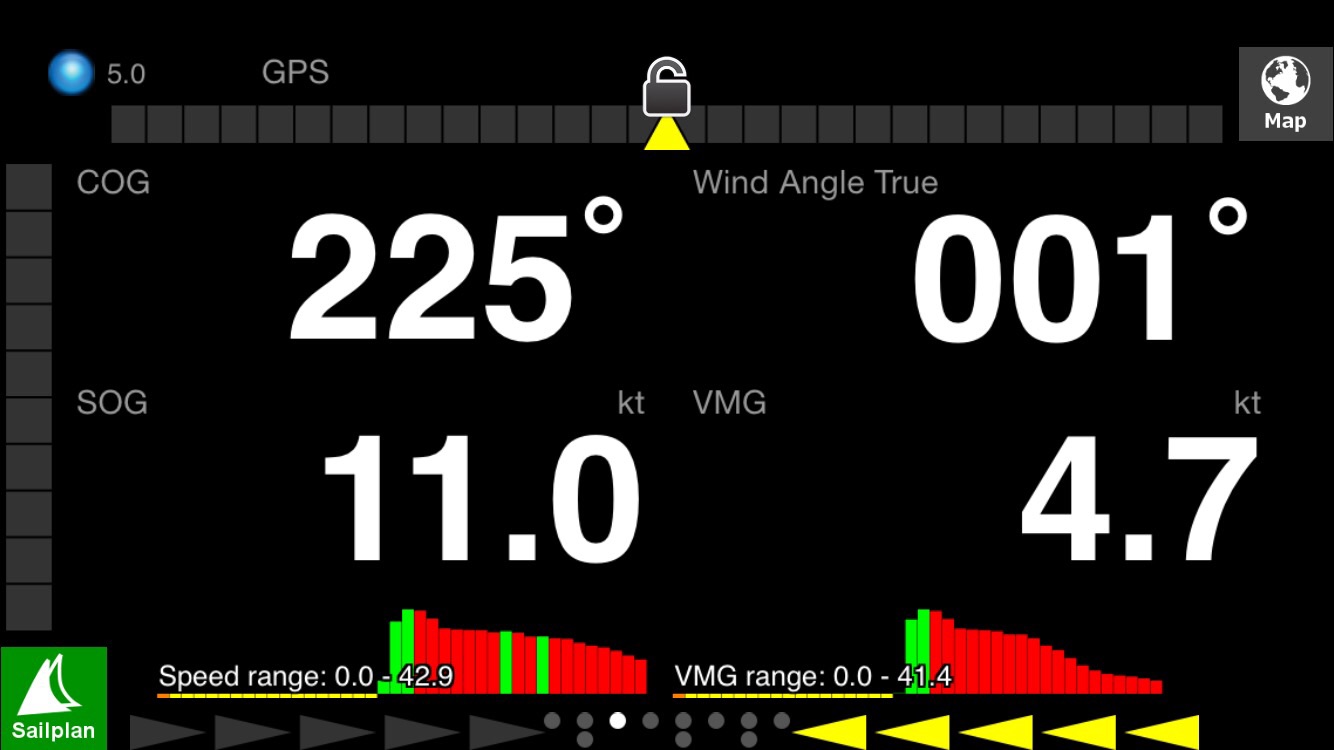
The main information in the Race View are the 4 readouts in the center of the view. These
are displaying live data updated every second.
Configure readouts
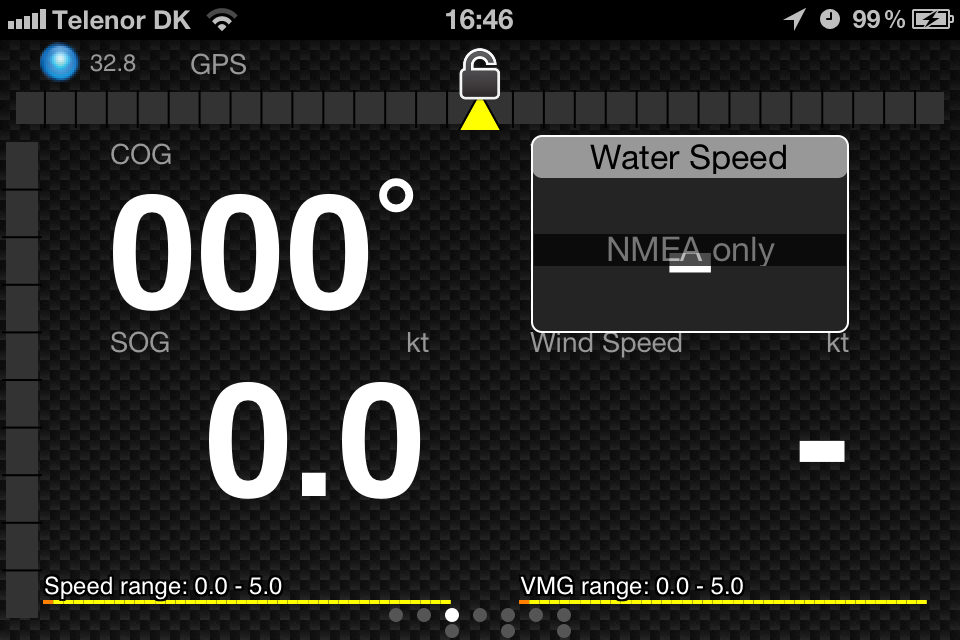
It’s configurable what kind of information you wan’t to display in the readouts. Tap the
readout you want to configure, and hold it for at least 2 seconds and the release it.
A drop down list will present the available options.
Some of the possible readouts only make sense if you are receiving NMEA data from your
boats instruments over a WiFi connection.
Available readouts:
- COG: Course over ground from GPS (internal or NMEA).
- SOG: Speed over ground from GPS (internal or NMEA).
- VMG: With respect to the wind direction.
- Compass: If received as NMEA information.
- Water Speed: If received as NMEA information.
- Water Temperature: If received as NMEA information.
- Wind Angle True: If received as NMEA information, or calculated from Apparent Wind information received as NMEA information.
- Wind Angle Relative: If received as NMEA information.
- Wind Speed: If received as NMEA information, or calculated from Apparent Wind information received as NMEA information.
- Wind Speed Relative: If received as NMEA information.
- Depth below Keel: If received as NMEA information.
- Depth below Surface: If received as NMEA information.
- Depth below Tranceducer: If received as NMEA information.
- Performance: Speed compared with polar target speed.
- Bearing: If navigating towards a waypoint.
- Distance: If navigating towards a waypoint.
- Pitch: From the accelerometer of the device.
- Roll: From the accelerometer of the device.
- Internal Compas: From the internal compass of the device. You can correct the value with the “Deviation (correction)” setting.
- Distance to Layline: Calculated if navigating towards a waypoint - see later.
- Optimum TWA: Best TWA according to your polar for current wind speed.
- Optimum Speed: Target speed according to your polar if steering optimum TWA.
- Polar Speed: Target speed according to your polar for current TWA.
- Turn: How many degrees you should turn left or right (L/R) to steer the bearing to next waypoint.
- VMC: With respect to the bearing to next waypoint (only available when navigation is started).
BIG-mode
Sometimes you would like to focus on one or two of the readouts, and for that case we have invented the BIG-mode.
Tap one of the 4 readouts and it’ll transform into big letters, while the 3 other will get smaller and move to the left hand side of the view. Tap it again and it’ll go back to normal.
If you tap one of the other 3 readouts while in BIG-mode, iRegatta will turn that into big instead. Now iRegatta will switch BIG-mode between these two readouts every 3 seconds.
That’s BIG mode.
Damping
Small changes in speed and heading may be confusing to look at, and that’s why iRegatta
has setting to damp your Speed and Heading readouts (COG and SOG, not compass and
speed through water).
In the “GPS” section of the iRegatta Settings you can choose how many seconds the
damping should be. The available settings are none, 3, 5 or 10 seconds. A damping of 3
seconds means that instead of the last heading value, an average of the heading of the last
3 seconds is displayed. This will give a little latency but also a smoother moving display,
not flickering too much.
Lift indicator
At the top of the view there is a lift indicator. This will show you if your current heading is
different from your average heading over the last 10 seconds. Assuming that you are
watching your sails and always steering the best apparent wind angle, this will show you
wind shifts. If you suddenly are steering a 10 degrees higher course, iRegatta will show
this as an 10 degrees lift in the lift indicator.
Small insignificant changes in course can be ignored by setting the “Lift threshold” in the
GPS section of iRegatta settings. Setting this to 5° will ignore shifts less than 5
degrees.
Speed and VMG history
At the bottom of the view there are two history graphs. They’ll show you how your speed
and VMG have changed over time.
In the GPS section of iRegatta settings you can set the “Graph timeframe” to values 2, 4, 10
and 20 minutes. This configures how long a timeframe the graph in the view is covering.
Yellow bars in the graph mean no change, green means you are going faster than the
measurement before and red means you’re going slower.
Performance bar
To the left you have a performance bar. This compares your current speed to your polars.
You can record or import polars into iRegatta (more about this in the Statistics view
chapter). The performance bar shows you how you are performing compared to your
polars. For this to make sense, iRegatta needs to know the right wind speed and wind
direction. If you don’t get these as NMEA information from your instruments, you can
type them in in the Wind view, but in ever changing conditions this might not make much
sense, and you can choose to hide the performance bar by setting the “Show performance
Bar” setting to “OFF” in the “Display” section of iRegatta settings.
Improve your VMG
At the bottom of the View, you see 5 arrows at each side pointing towards the center of the
view.
These are “Steering bars” that help you steer to optimum VMG.
To do this, iRegatta uses Tack and Jibe angle informations. If you have a valid Polar and
NMEA wind information, this will show you what course to steer to get the best VMG
according to your Polar. If you have turned off “Tack and Jibe from Polar”, the typed in
Tack and Jibe angles from the Wind View will be used instead.
In case you don’t have NMEA Wind information, this guide is questionable, and you can
hide it by setting “Show Steering Bar” to OFF in the iRegatta settings.
Chart plotter
(iRegatta version 3.60.0 or higher)
Tap the "Maps" button in the upper right corner, to make the readout move to the side and make room
for a map view.
Turn off speed and VMG history, to get more room for the map.
In the upper right corner of the map you'll see a red arrow showing the wind direction.
In the upper right corner of the map, there'll be small blue arrows showing the current direction - unless the current speed is zero.
On the right side you'll get a column with buttons, to configure your map view.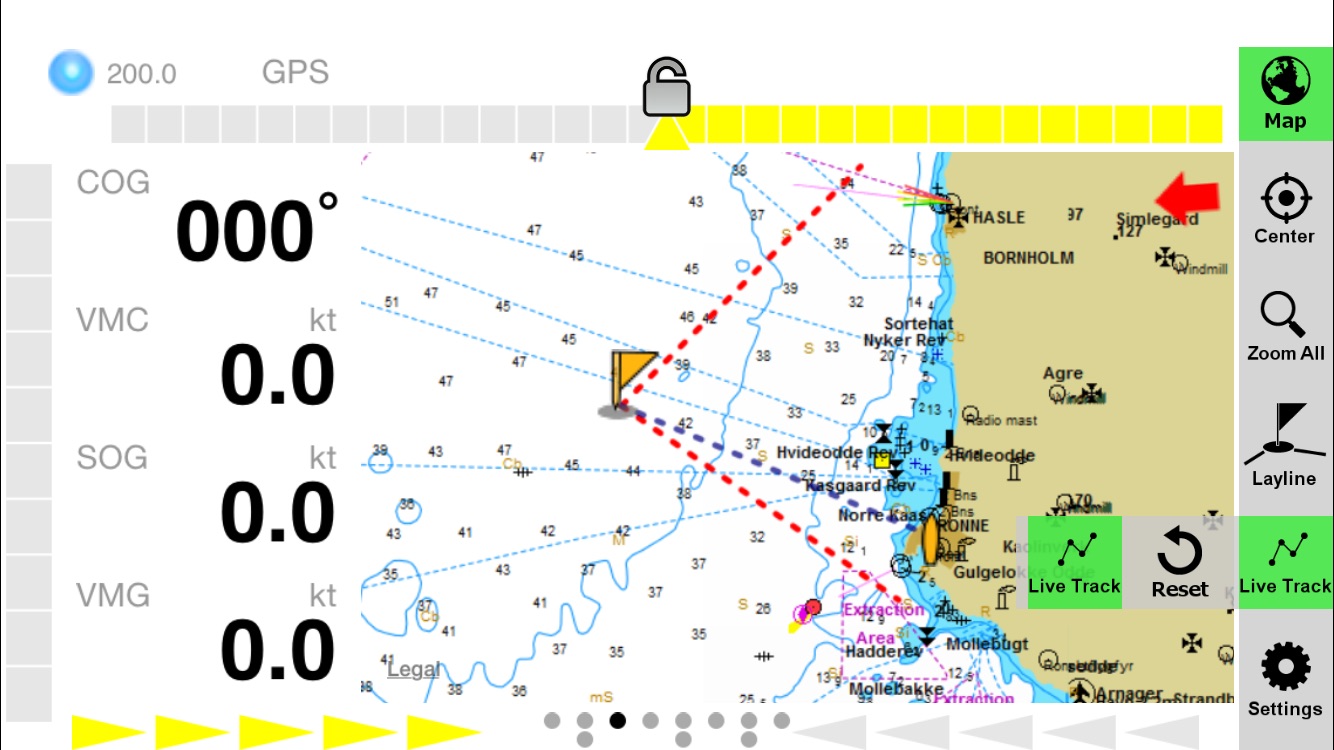
Activate the "Center" button (Green background), to always keep your current position in the center of the map.
The "Zoom All" button will turn off the center feature, and zoom to include current position, waypoint (if navigating) and startline.
The "Live track" feature will draw a track on the map, with a new point every 10 seconds. This track is not stored and has nothing to do with the tracking feature in the navigation view. Delete the track by tapping the "Reset" button.
Tap the "Settings" to get a few map options: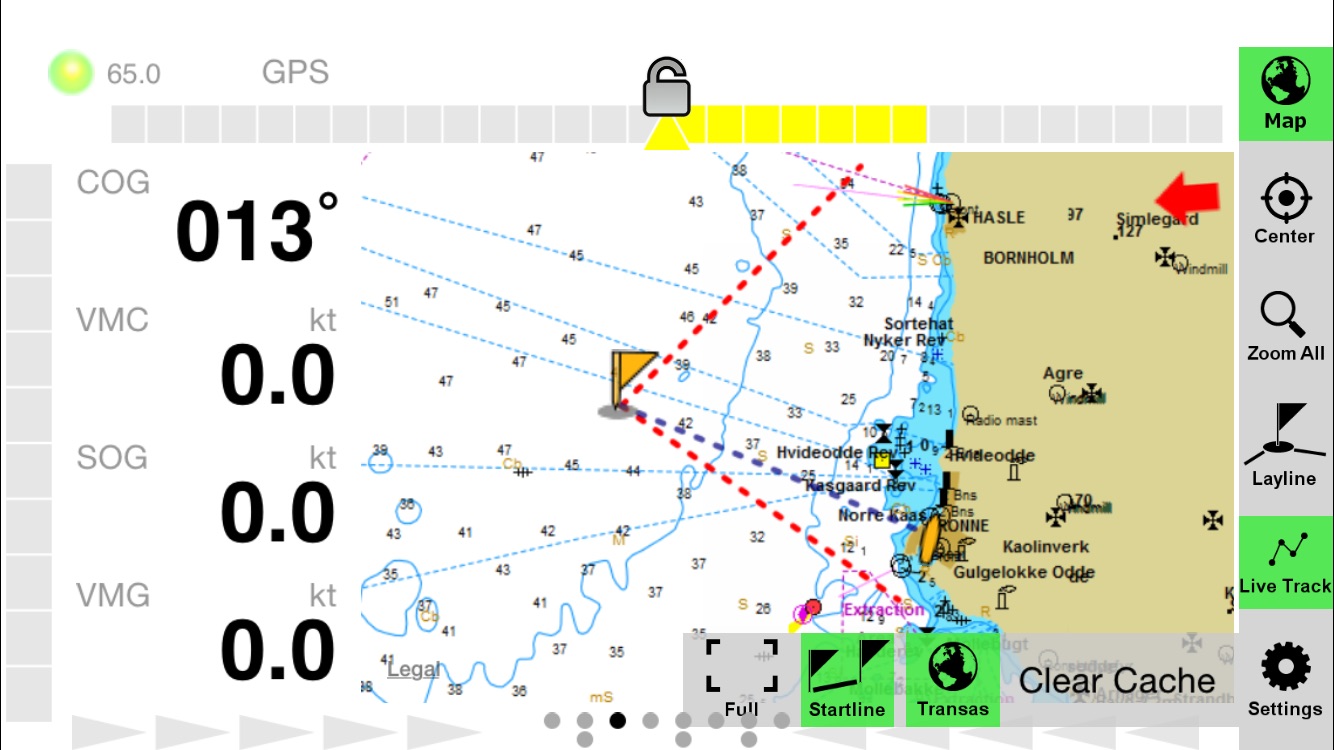
- "Full" will increase map size to full screen.
- "Startline" determins if the startline is displayed on the map.
Laylines
If you are navigating towards a waypoint, laylines are displayed on the map. Tap the Layline
button to replace the standard race readouts with layline time and distance.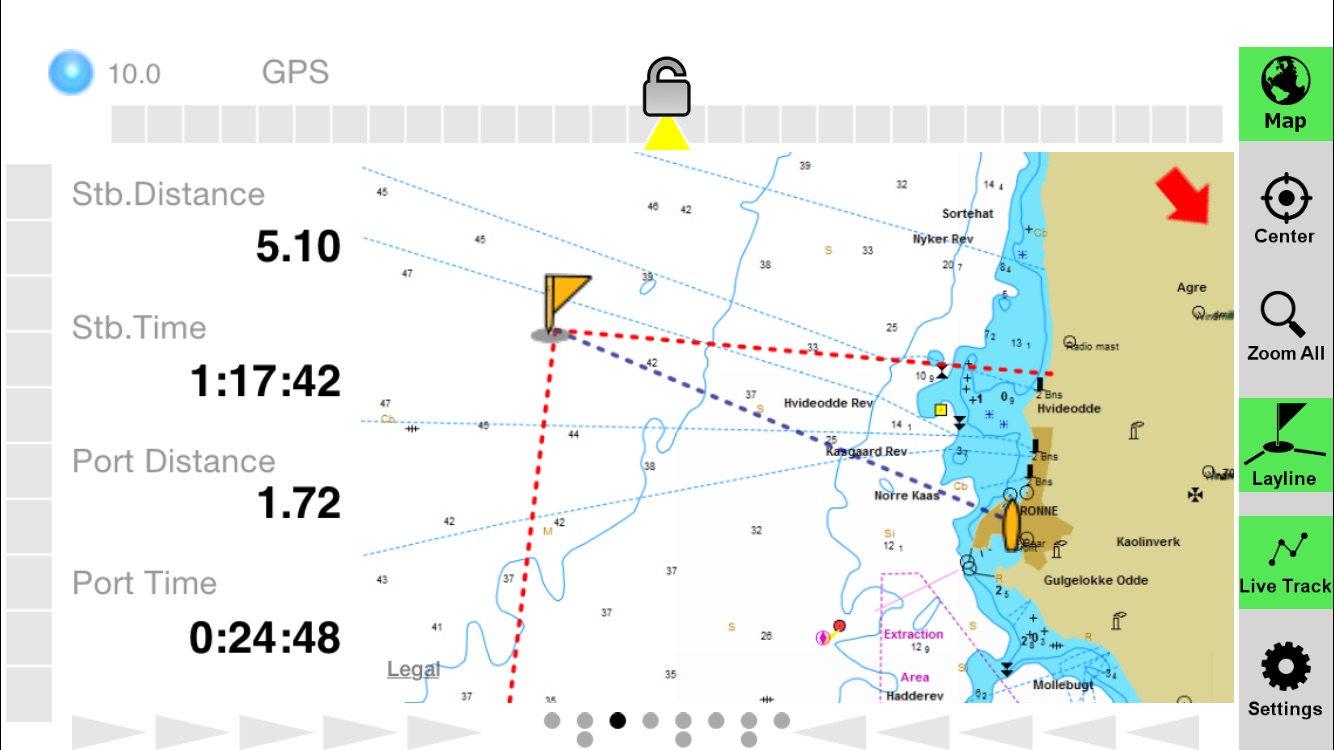
Based on the wind direction and the bearing towards the waypoint, iRegatta determines if
you are going upwind or downwind, and visualizes you Tack or Jibe angles with red lines.
If you have a valid polar and have turned ON “Tack and Jibe angle from Polar”, it’s the
optimum VMG angles from the current polar that is used to lay out the laylines.
Your bearing to the waypoint is shown as a blue line.
This will help you determine if you are ready to tack or jibe to head towards the waypoint.
iRegatta shows you the distance you have to sail on starboard to get to the
waypoint, and the distance you’ll have to sail on port tack. The
calculations are made using the tack/jibe angles entered or calculated from the polars. So
if you aren’t sailing optimum TWA, distances might be different.
In case you are over the layline, iRegatta will only calculate distance and time for one tack,
and time will be calculated using polar speed for the actual TWA you have to the
waypoint.
In the race view you can also chose to view distance to lay line. iRegatta will determine
your current tack, and will show the distance for that tack in the readout.The Math
iRegatta can calculate laylines in different ways, depending on the information available.Wind direction and tack/jibe angles are needed to calculate the laylines. In case of current, the influence
of the current depends on the boat speed as well.First chois will be to use the polar files. Optimum TWA and polar boat speed is used to calculate laylines, current influence and distance/time to the Layline.
If your polar is not up-to-date, or you don't perform as your polars predict, your laylines will not be correct.If the polar is reset (no polar values), the next chois will be to use NMEA "Speed Through Water" as speed input to the calculations. It is assumed that you are sailing the speed you'll be sailing the rest of the way to the waypoint. Entered Tack and jibe angles are used as well.
If NMEA Speed Through Water is not available, the last option will be to use COG and SOG, and correct it with the entered current information, to get a calculated heading and speed through water.
Start view
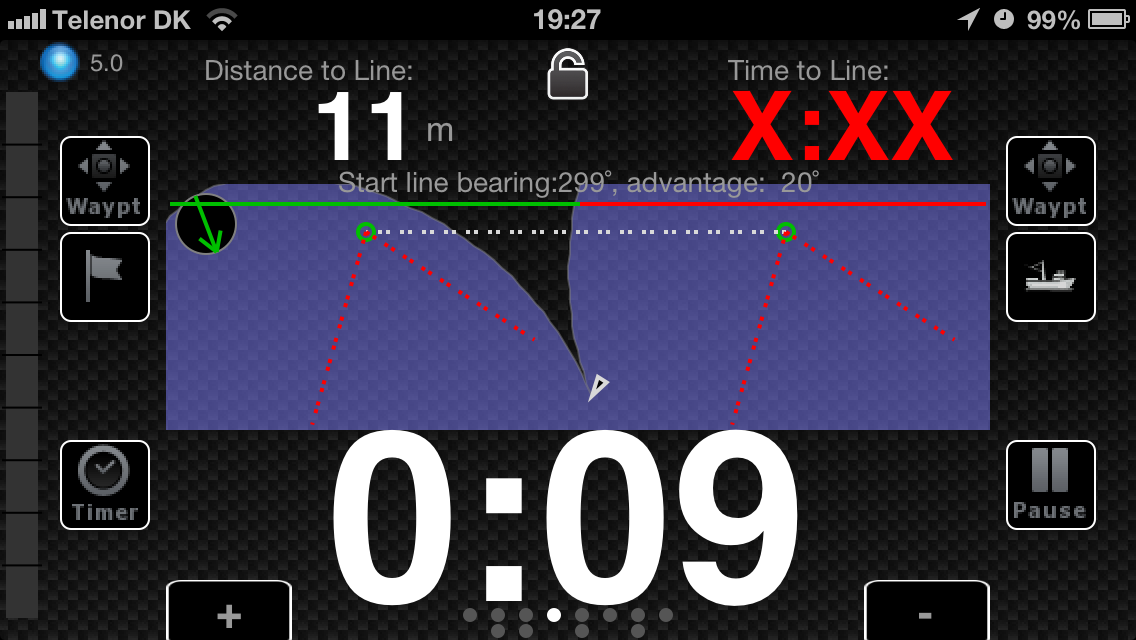
The Start View will help you get the perfect start. Identify the line and time the gun and
iRegatta will tell you everything you need to know to get the perfect start.Count down
The main thing about getting a good start, is to have a countdown for the gun.
iRegatta has a count down clock with a sync feature.
Tap the numbers to start the count down. I you press the numbers again while the count
down is running, the clock will change to the closest minute. This means 3:25 will sync to
3:00 whilst 3:42 will sync to 4:00.
While counting down you can tap the “Pause” button, to stop the count down from
running. If you tap “Reset” while the clock is paused, the clock will reset to original value.
If you tap the “+” or “-” buttons when the count down is stopped and synced, it’ll change
the setting from where the count down starts next time. You can also add or subtract 1
minute from a running count down, if taping the buttons while the count down is running
or paused but not synced.
In the “Start” section of the iRegatta settings, you can also chose to turn on “Timer beep”.
This will give you sound signals while counting down at every full minute, at 30 seconds,
at 10 seconds and every second the last 5 seconds before start.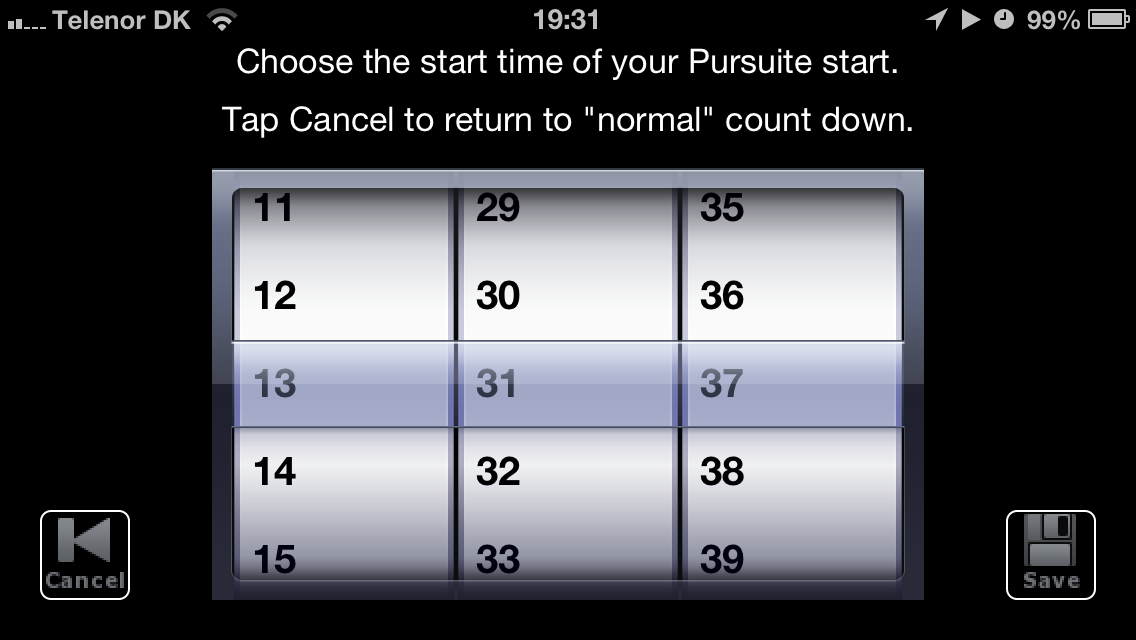
If you are racing in a handicap race with a pursuit-type start, and you want to type in a
time for your start, tap the “Timer” button in the lower right corner. It’ll take you to a view
where you can choose your start time.
When you tap the “Save” button, a count down to that start time has started. You can only
choose a time that is within the next 24 hours. You can leave iRegatta and restart it again
before the start, and it’ll still be counting down to that time.
The Start, Pause, Sync, Plus and Minus features are disabled when in pursuit mode. To
return to “normal” count down mode again, tap the “Timer” button again and leave the
pursuit start view again with “Cancel” instead of “Save”.
When the countdown reaches 0:00, iRegatta automatically switch to the Race View.Know the line
The next important thing is to know the starting line.
iRegatta will help you identify and evaluate starting line, and to get there in time.
You can sail to the boat and pin end of the line and mark them by tapping the buttons at
the end of the line. In case you are racing on a fixed tuesday night course, you can also
choose some pre stored waypoints as line ends by typing the “waypt”.The favored end
Now that iRegatta knows where the line is and where the wind comes from, it’ll show you
which end of the line is favored. The line is shown as a red and green line across the view.
The end that shows up as green is favored. (This is only valid if you are starting on an
upwind beat to the first mark. If that’s not the case other factors can influence what end is
favored).
Over the “favored end indicator” you can see how many degrees the line is favored.
On a perfect starting line the wind should be perpendicular the the line. This is almost
never the case. In the left end of the “favored end indicator”, you’ll see a circle with an
arrow in it, showing the wind direction in relation to the starting line. Below you’ll also
see a schematic view of the starting line and your position and heading in relation to it.Time and distance to line
Above the line you also get numbers for distance and time to line.
In the iRegatta Settings in the “Start” section, you can type in a “Offset from bow”. This is
used when calculating the distance to line. If you are using the internal GPS of your
device, you should type in the distance from your device to the bow. If you are
getting GPS positions as NMEA input, you should type in the distance from your GPSantenna
to the bow.
The distance to line shown in the view, is the distance measured perpendicular to the line
or it’s extensions from your current location. This means that if you are 300 meters from
the line ends but would intersect the lines imaginary extensions in 3 meters, iRegatta will
show 3 meters, NOT 300 meters. iRegatta assumes you are able to find your starting line
end your self.
Time to line is calculated by comparing the distance to line with how much you’ve been
closing in on the line over the last 10 seconds. This means that as long you are aiming at
the starting line and moving, the numbers are valid.
If you are sailing against the direction you would sail to cross the line, Time to Line
doesn’t make sense, so iRegatta will display X:XX.
If you are over the line, iRegatta will show the numbers in red.Burn or Gain
On the left hand side of the start view, there is a “Burn or gain” bar. It visually shows you
if you are early or late to the start, or in other words if you have to burn time or gain time.
This doesn’t make sense if you are moving away from the line or are over the line, so in
that case the bar will be greyed out.
If you are right on target, the bar will be displayed in Yellow.
If you are to early (Time to Line is less than the count down), a red bar will show down
from the top of the Burn or Gain bar. The length of the bar depends on how early you are.
If Time to Line is 40 seconds but the count down shows 60 seconds to the gun, you are 20
seconds early, and this will be shown as 33% of the bar red. (You need to take 33% off your
current speed to hit the line at the gun).
If you are late (Time to Line is more than the count down), a green bar will show from the
bottom of the Burn or Gain bar. If Time to Line is 60 seconds and count down shows 40
seconds to the gun, you are 20 seconds late, and the bar will be show 50% green. (You need
to add 50% off your current speed to get to the line in time).Polar speed
A blue polar will be projected upon you boats position, scaled so you can see where you
can go in the remaining time until the start, if you go as fast as your polar says you can.
That makes it easier to determine if you can make it to the other end of the line in time.Wind View
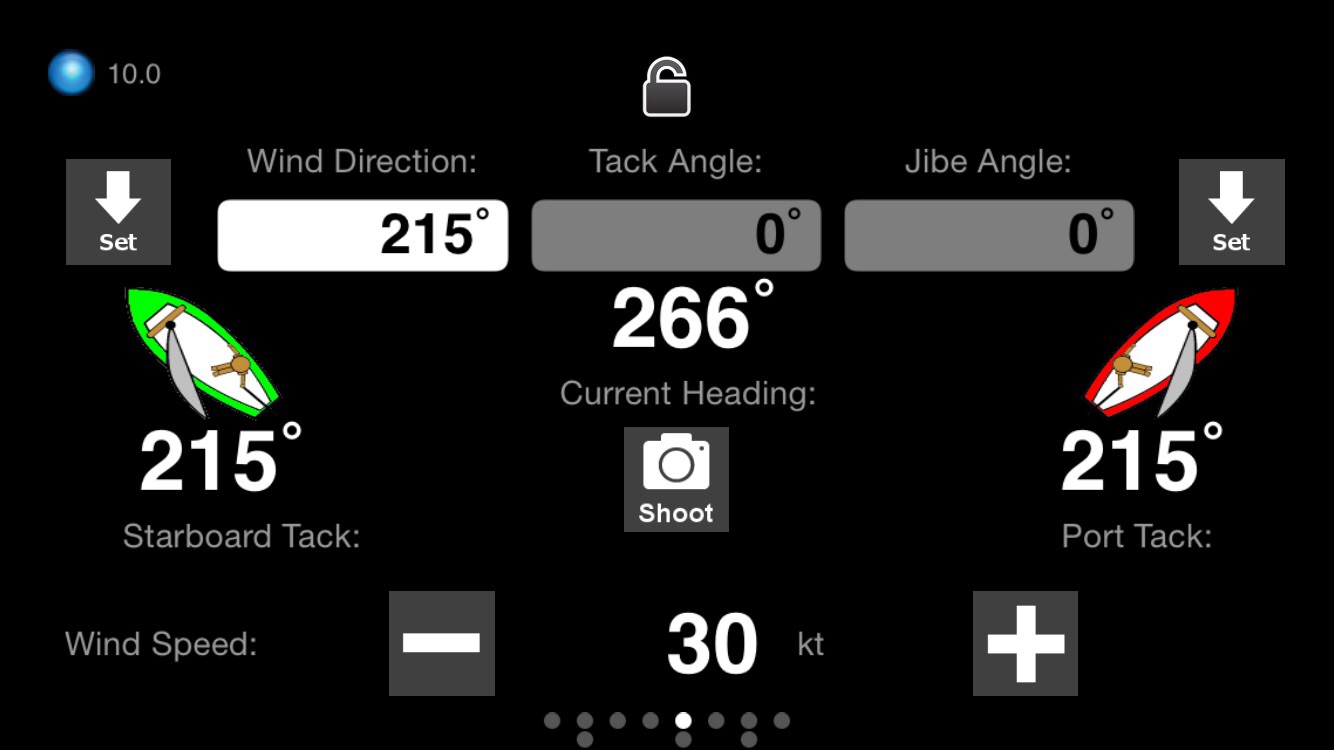
In the wind view you set information about the current wind conditions. This mainly used
if you use iRegatta on a stand-alone Android devices. If NMEA
information about wind is received, most of the inputs are disabled.
In case you are using iRegatta on a stand-alone device, the wind view is where you set
information about wind direction and speed.
You have 3 different ways to set the wind direction:- Type it into the wind direction text field.
- Sail close haul on starboard tack and tap the left “Set” button, then sail close haul on
port tack and tap the right “Set” button. iRegatta will assume that the wind direction is
in between these two heading, and will calculate your tack angle for you as well.
Wind speed is set by the + and - buttons at the bottom of the view.
Wind speed is mainly used to select the right polar for update and performance
calculations.Use the Polar
In the iRegatta settings you have the option to turn on “Tack and Jibe from Polar”. In that
case iRegatta will disable text entry in the Tack and Jibe angle fields. Instead iRegatta
calculates the best tack and jibe angle from the polars - that will be the angles with the best
VMG. Make sure you have a good, symmetric and valid polar for all wind speed before
you activate this option.The Tack and Jibe angles are used to calculate the laylines. Read more about these in the
Laylines section of this manual.NMEA input
If you are getting wind information as NMEA input over a WiFi connection, the inputs in
this view will be disabled, and all fields are informational only.Rotating mast
If you have a rotating mast with a mast head wind sensor, you can now fit a rudder sensor to your mast and let iRegatta handle the "rudder sensor angle" data to correct your AWA input before calculation of TWA.To activate this feature, go to the "Rotating Mast" section of iRegatta settings, and turn ON "Use RSA NMEA sentence for mast rotation".
In case you also have a rudder sensor on your rudder (would make sense), you can enter a "Talker Id" of the sensor handling the mast rotation. If you leave the entry field empty, any RSA sentence will be handled as mast rotation, if "Use RSA NMEA sentence for mast rotation" is turned on.
If the rotation correction is calculated the wrong way around, turn ON "Reverse values", and the rotation values vil be subtracted instead of added.
In case the rotation sensor is not aligned correctly (not returning 0 when centered), you can enter a correction value in the "Mast rotation Correction" entry field.
Wind History Graph
You have to slide down from the Wind View to see the history graph.
The graph shows how the wind direction and speed has changed over the last 30 minutes.
A state is stored every 30 seconds.Current
In the current section you can choose to enter current or let iRegatta detect the current.When entering the current, the direction is entered like wind direction. This means you enter the direction it is flowing from. If it flows from north to south you would enter 0 as direction. Speed is entered in the same units you have set for speed output.
If you choose to let iRegatta detect the current, you need to have "Speed through Water" and "Compass" information from a NMEA feed. Theese alon with COG and SOG from NMEA or the devices internal GPS are used to calculate the current.
Current is used to correct time, distance and direction to laylines in the Race map.
See more here:
Laylines section of this manual.Navigation View
The Navigation View is where you set up waypoints or routes to navigate.
If you have entered waypoints or routes (more about that later in this chapter), you can
choose to “Start” or “Pause” navigating towards that waypoint.
One of the consequences of navigating towards a waypoint is, that
VMC will be calculated with respect to the bearing to the next waypoint.
In versions prior to 3.38.0 VMC was not implemented. In those versions VMG will
become VMC when navigation is started.
When navigating, Bearing and Distance to the next waypoint will be calculated and shown
at the bottom of the view. The units of the distance depends on what “Speed units” you
have chosen in iRegatta settings. If you choose knots, distance will be in nautical miles.NMEA waypoints
If you are receiving BWC or RMB sentences as NMEA information, iRegatta will use these
as next waypoint. In the settings you can ask iRegatta to ignore these, to keep using
iRegattas own waypoints.Routes
If you have created a route you have chosen to follow, additional buttons and informations
will become available.
First of all you’ll get a “Previous” and “Next” button next to the waypoint name. With
these you can step through your route.
In the iRegatta settings you can choose to turn on “Auto advance Route”. This will make
iRegatta automatically step to the next waypoint in the route when you are within the
distance of the waypoint that you set in the “Auto advance Distance” setting.
You’ll also get information about the next leg in the middle of the view. You’ll know the
bearing and length of the next leg, and the estimated True Wind Angle. This will help you
prepare the next and help you to decide on sail changes. The green or red indicator to the right in the "Next leg" section, shows if next leg will be on starboard or port tack.
Tap on the "Next Leg" section, to get a list of all legs in the route.Waypoint and route administration
If you tap the “List” button, you’ll get into the waypoint and route administration view.
More about that in the next section.Tracking
If you tap the “Track” button for 2 seconds or more, you’ll toggle tracking on/off (the
button turns green/red).
If you tap it briefly, you’ll get to a list view showing you all recorded tracks. In case you
leave iRegatta while tracking, and re enter iRegatta, tracking will continue - but while
iRegatta is not in the foreground, no track points will be added.
If you tap on a track in the track list, it’ll be shown on a map (if you are connected to the
internet). From the map you have the option to export the track via mail (tap the “Mail”
button), or share your track including data like distance, time and Max Speed, with your
friends on Facebook.
See the In-App Purchase section for "Post Race Analysis" of a recorded track.Course View
If you slide down from the Navigation View, you’ll find the Course View. Here you’ll see a sketch of a course with 3 buoys and a starting/
finishing line.
iRegatta has 4 default waypoints that will always be available when creating routes. These
are the “Starting vessel” and “Buoy 1”, “Buoy 2” and “Buoy 3”.
You can create routes with these race course waypoints, and modify them as you go along.
If you create a route with ex. Start - 1 - 2 - 3 - 1 - 3 - Finish, you can start of by entering
approx. buoy locations using the “Bearing & Distance” tool,
and save them as buoy 1, 2 or three. As you go around the course, you slide to the course
view and tap the buoy buttons as you round the marks, to get the positions more precise.
The route will adjust as you adjust the buoy position, and your distance, bearing and other
calculations will improve for the next round on the course.
The position of the starting vessel will adjust as you ping the line in the start view.Waypoint and Route administration
If you click the “List” button in the Navigation View, you will enter the waypoint and
route administration view.
If you already have waypoints or routes stored, you simply tap on one in the list to choose
this as your navigation target - this will take you back to the Navigation View. Remember
to tap the “Start” button to start navigating.
If you slide to the right over one of the lines in the list, a “Delete” button will appear on
the right hand side of that line. Tap it to delete the waypoint or route.
At the top of the view there also is a “Delete All” button. If you tap it you’ll get a “Are you
sure...” pop up. If you tap on Ok, all waypoints and routes will be deleted.
If you tap the “Edit” button, you’ll be able to edit existing waypoints or routes.Adding Waypoints
If you tap the “Add Waypoint” button at the top of the view, you’ll be taken to a new view
where you can name a new waypoint and type in the location. Your current location will
be pre filled in, so you can accept that or type in a different value.
In the iRegatta settings you can choose your preferred “Waypoint format”: Degrees,
minutes, seconds or Degrees, minutes, decimal.
Save your waypoint be tapping on the “Save” button. This will take you back to the list.
If you tap any of the buttons “Buoy 1”, “Buoy 2” or “Buoy 3”, the position of the according
buoy will be overwritten with your entered values.Editing Waypoints
When you edit a waypoint, a “Pos” button is visible right next to the coordinates. If you
tap on that, the waypoints position is updated to your current position. Tap “Save” to save
the change.Adding routes
Tap the “Add Route” button to create a new route. At the top of the view you can type in
the name of your new route. On the lefthand side you have a list of all available
waypoints, and on the righthand side you see your route. Tap on the available waypoints
in the order you want to add them in the route, and you’ll see them add to the list on the
right. If you tap a waypoint in your route, it’ll get removed from the route again.
Tap “Save” to store the route and return to the List View.Temporary Waypoints
iRegatta has another way to create temporary waypoints, without entering any coordinates.- “Create Temporary wpt by bearing & distance”. This will let you create a waypoint by
typing in distance and bearing from your current location. When racing you often have
an expected length of first upwind leg, and get a bearing from the starting vessel.
Statistics View
In the Statistics View you can see Max speed and Trip odo since your last reset, current
position and polars.
In this view you get some statistics of your sailing.
To the right you see your Max Speed and Trip Odometer since last reset. If you tap the
“Reset” button, these two numbers will be set back to zero.
At the top of the view you see your current location.Map
If you have internet access, you can tap on the “Map” button to view your current location
on a map. Android uses Google Maps.
In Map View you can choose if you want to show your current position, start line, current
waypoint and/or track.Weather Map
In iRegatta you have the option to use WXtiles online weather maps if you are connected to the internet. This is a service provided by metoceanview.com.
You'll have access to many different weather informations, that can be choosen from the right side menu.
At the bottom of the page you can step forward in time to check the forecast.
You can not zoom into to much detail in the weather maps, as the stop at a high zoom level.
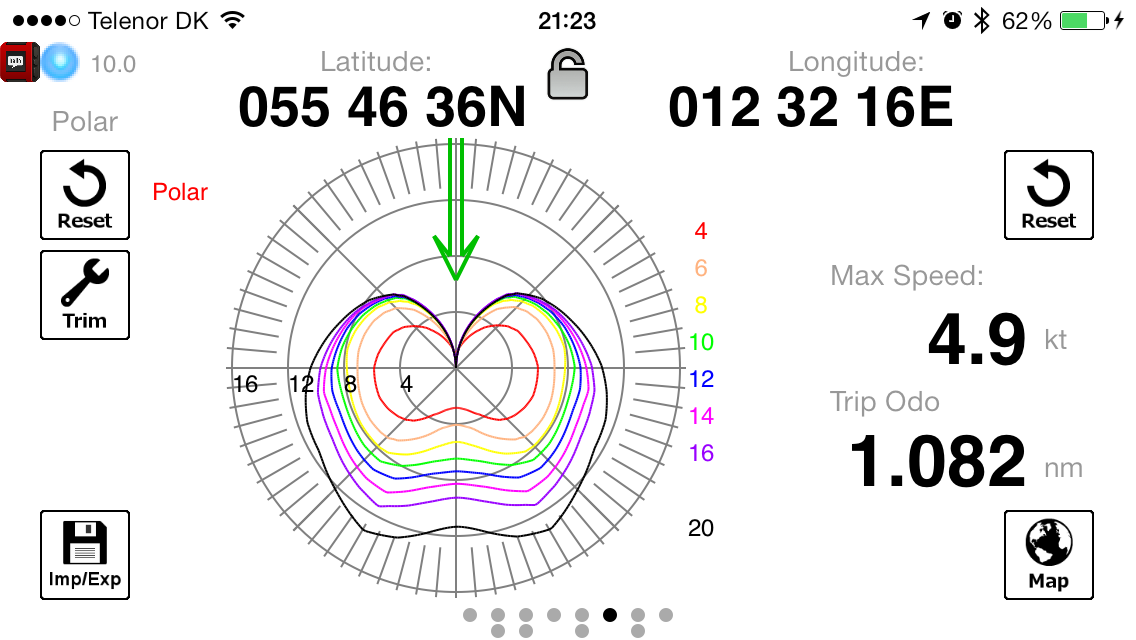
Polar
The most important and complex part of this view is the Polar.
iRegatta can record polars for every knot of windspeed from 1 to 40 knots of wind. In the
left side of the view, you can choose if you want to record your performance to modify the
polars, or if you just want to use your current polars as they are. Long tap the “Update”
button to change this setting. If green, polars are updated.
To record a valid polar, it’s very important that you have the right wind speed and
direction information set. If you have wind information as NMEA input, you are in good
shape. Wind conditions are often not that stabile, so manual input will make your
recorded polar a bit unreliable.
The Polar graph shows the values for 4, 6, 8, 10, 12, 14, 16, 20, 30 and 40 knots of wind!
If you tap the “Reset” button in the polar section of the view, all polars will be cleared if
you accept the “Are you sure...” pop-up.
If you tap the polar, it’ll switch between showing Polar and showing VMG.Import/Export
Polars
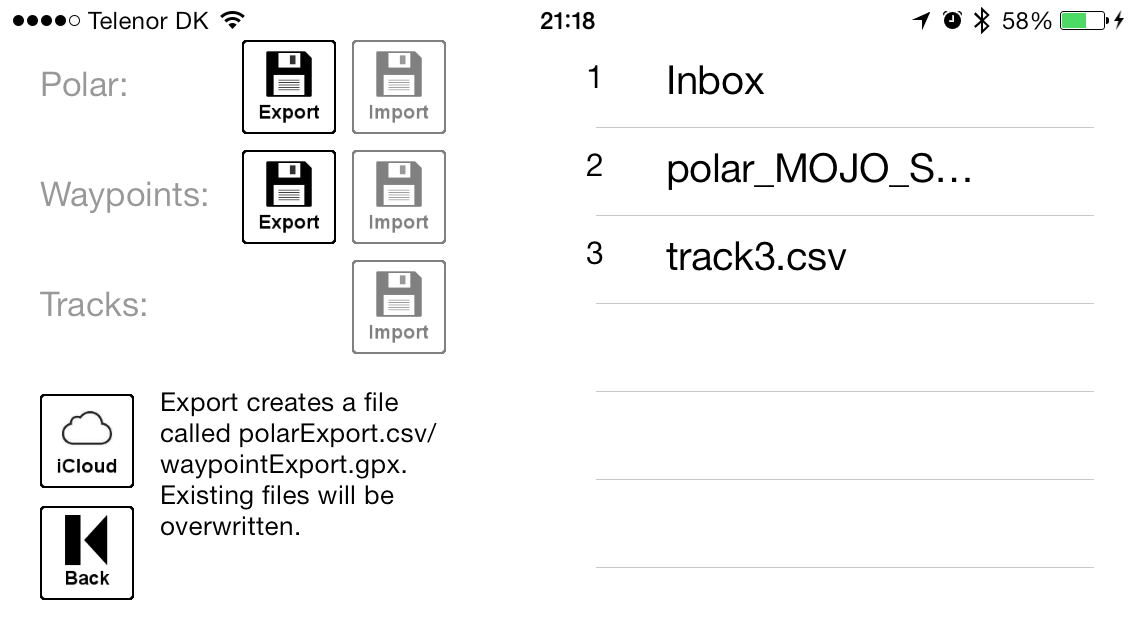
You can export your current polars or import stored polars.
If you choose to export your polars, they will be stored in a file called “polarExport.csv”. If
the file already exists, it will be overwritten.
On Android an iRegatta folder will be created on the SD-card, where you’ll find the file.
The polar files are .csv files, that can be opened in your spreadsheet program. It has two
rows with headers and after that a 40 by 360 table with speed for every wind angle (TWA)
in 40 wind speeds (TWS) - that’s a lot of numbers.
To reduce your work, you only need to fill in the rows and columns you have data for, like
in the table below, where we only have data for TWS of 4, 6, 8, 10, 12, 14, 16 and 20 knots
of wind.wind speed and boat speed in knots TWA/TWS 4 6 8 10 12 14 16 20 30 2.51 3.77 4.73 5.38 5.73 5.92 5.99 5.88 33 2.86 4.25 5.3 5.93 6.26 6.44 6.51 6.49 36 3.19 4.68 5.78 6.37 6.68 6.86 6.94 6.97 39 3.49 5.06 6.17 6.73 7.03 7.19 7.28 7.32 42 3.76 5.4 6.51 7.04 7.3 7.44 7.52 7.59 45 4.01 5.7 6.8 7.28 7.51 7.64 7.73 7.81 50 4.37 6.11 7.17 7.58 7.78 7.92 8.01 8.12 60 4.91 6.68 7.62 8.01 8.22 8.38 8.5 8.66 70 5.24 6.99 7.85 8.33 8.57 8.76 8.91 9.15 75 5.34 7.07 7.91 8.44 8.73 8.93 9.11 9.4 80 5.38 7.11 7.94 8.5 8.87 9.1 9.31 9.66 90 5.34 7.07 7.92 8.52 9.02 9.43 9.71 10.18 100 5.12 6.98 8.03 8.43 8.96 9.52 10.02 10.78 110 5.04 7.09 8.13 8.6 8.96 9.31 9.91 11.25 120 4.97 6.98 8.06 8.71 9.16 9.59 10 10.89 130 4.65 6.59 7.77 8.55 9.23 9.84 10.35 11.51 135 4.39 6.29 7.57 8.38 9.1 9.83 10.52 11.85 140 4.08 5.93 7.31 8.17 8.88 9.64 10.46 12.2 150 3.44 5.13 6.58 7.62 8.35 9.01 9.73 11.62 160 2.84 4.29 5.63 6.8 7.67 8.34 8.96 10.38 170 2.45 3.72 4.93 6.08 7.09 7.85 8.49 9.74 180 2.27 3.43 4.57 5.67 6.67 7.5 8.14 9.29
The easiest way to make a polar file your self, is to reset the polars in iRegatta, export it
and load it onto your computer. Type in the values you know in the right wind speed/
angle fields, and save it as a new .csv file. This should ensure you have the right format
and the right number of rows and columns.
On Android just place the file in the iRegatta folder on the SD-card.
Tap the file in the list and tap the polar import button.
Check the Trim section later in this chapter on how to improve your polar.
Hint:
CVS-file format depends on national settings on your computer. iRegatta uses US settings which means decimal seperator is a "." and field
seperator is a ",". If you load such a file into your spreadsheet program on your computer (like Excel), and your national settings has "," as decimal seperator,
all numbers will in each row will end up in just one cell.
In that case, open the CVS-file in a text editor and first replace all "," with ";" and then all "." with "," (it's important you do this in the right order).
Then you should be able to import it into the Spreadsheet program.Once you've done your work, you need to replace all "," with "." and then all ";" with "," (again order is important). Then it's ready to import into iRegatta.
Waypoints and Routes
You can also import or export waypoints and routes in the GPX file format.
Exporting will generate a file called “waypointExport.gpx”, if it already exists it will be
overwritten.
Importing a GPX-file will add waypoints and routes to the existing list of waypoints and
routes. Importing 10 waypoints two times will result in 20 waypoints in the list. No
waypoints or routes will be overwritten.Tracks
You can also import tracks into iRegatta. This is especially useful if you want to use the
“Post Race Analysis” feature that can be bought as an In-App purchase.
Currently all data need to be in the exact same format as the track data you can export
from iRegatta using the “Mail” button when reviewing a track.Polar Trim
If you create your own polar in a spreadsheet, you probably wont type in 360 values for 40
windspeed - that would be a lot of work. Like in the sample shown here, you could type in
values for every 20 degrees on one half, and maybe for 4 or 5 wind speed.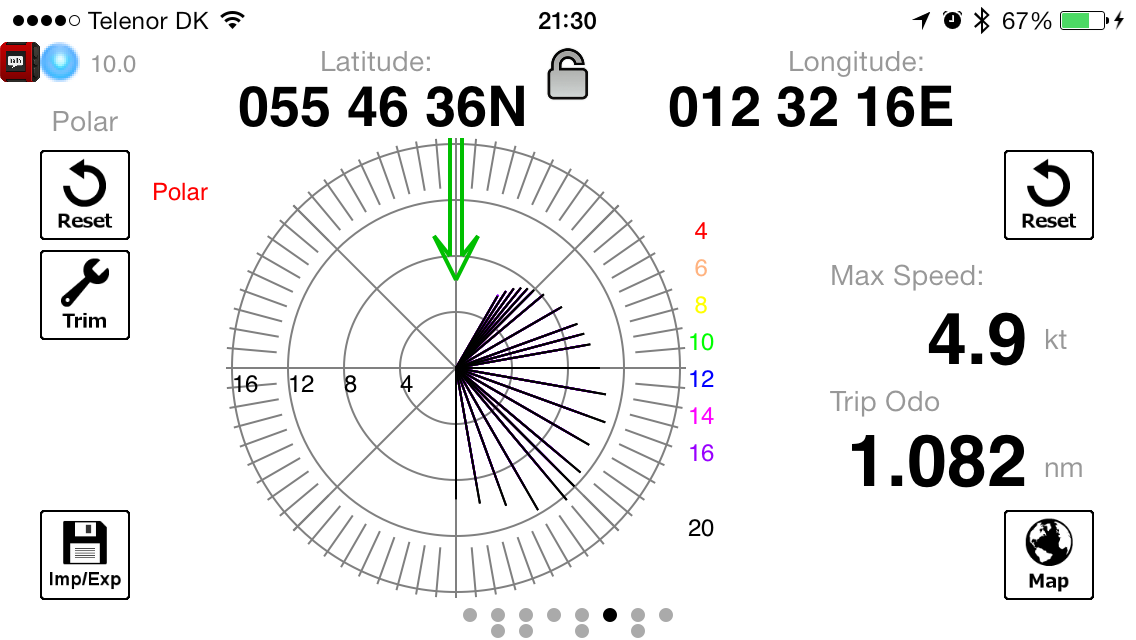
After that you import the polar into iRegatta and tap the “Trim” button. This will
mirror the values (if you have a value recorded for 40 degrees and 360 degrees, they both
will get assigned the highest of the two values). After that iRegatta will interpolate over all
missing values, and smoothen the curves over every 10 degrees span.
After that iRegatta will interpolate across wind speeds, and smoothen over 4 knots wind
speeds.Auto trim
If your polar file has less than 360 lines of TWA, iRegatta will automatically trim the file, so you have a full polar.
IMPORTANT: For the polars to work best, and give you the right optimum TWA downwind, it's important that you also enter values for going deeper than optimum TWA, and preferable values for dead downwind (180 degrees). If not, iRegatta will interpolate interpolate and give you the best VMG at 180 degreese, which would be wrong.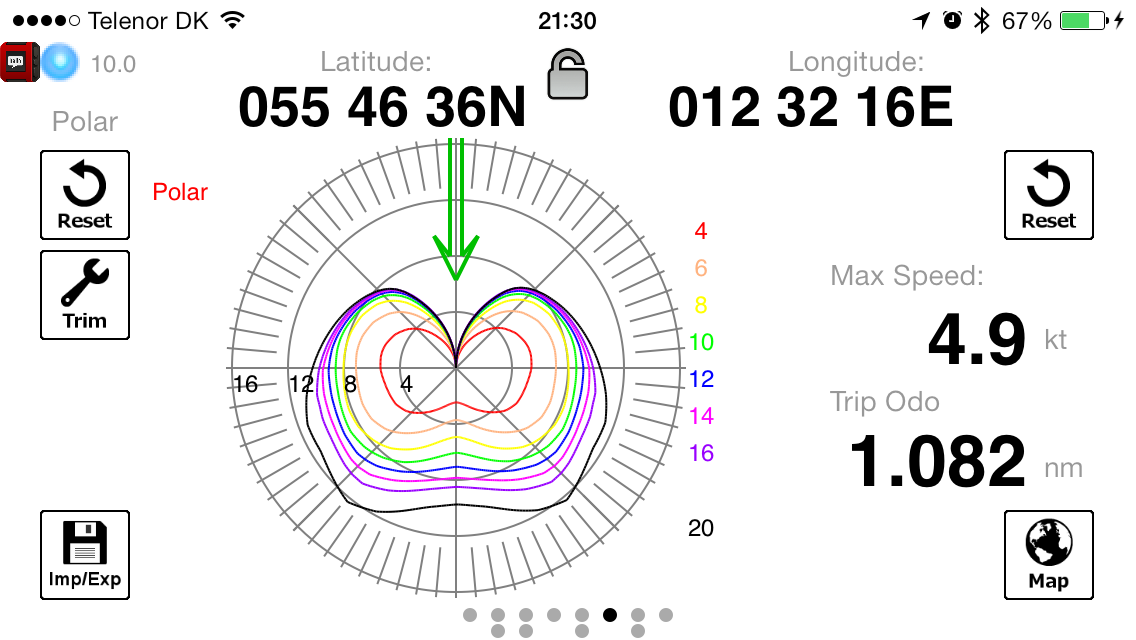
The image above shows the effect of the “Trim” feature.
Of cause this can also be done on recorded polars.
Quite a few polars are available at www.zifigo.comNMEA View
If you have connected your Android device to your boats instruments over
a WiFi connection or Bluetooth, this is where you can see your instrument
data.
iRegatta supports the NMEA0183 standard. But there are many different NMEA sentences,
and not all are supported by iRegatta.
In case some of the readouts don’t update as expected, you can record a NMEA log by
using the free app “iNMEAlogger”, and mail the log to info@letscreate.dk with a
description of what information you are missing, then I’ll take a look at it and see what we
can do about it.
As default the NMEA protocol adds a checksum at the end of every sentence, to ensure
that you don’t receive corrupt data. However some devices don’t add that checksum, and
to be able to receive those sentences, you have to turn ON the “Ignore NMEA checksum”
in the iRegatta settings.
As default the readouts are greyed out. When NMEA information is received for a
readout, it’ll turn active and display the values.
In the iRegatta settings you can also choose if you want to display “Magnetic” or “True”
NMEA compass heading.True Wind
In case you get NMEA relative wind information but not true wind information, iRegatta
will calculate true wind for you.
If you have NMEA compass heading, it’ll be used for the calculation, if not, course over
ground from the GPS will be used.
If you have NMEA speed through water, it’ll be used for the calculation, if not, speed over
ground from the GPS will be used.Wind Instrument
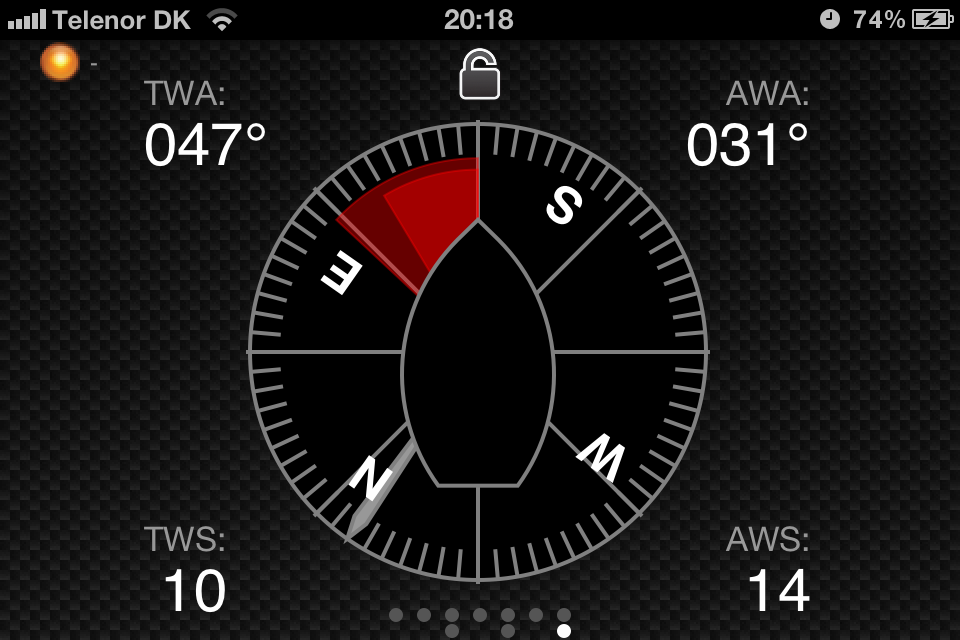
You have to slide down to see the instrument.
On this instrument you can see the True Wind information on the left and the Apparent
wind information on the right.
The red or green colored areas of the bow in the instrument illustrates the true and
apparent wind angles.
There’s also a arrow showing you where North is.AIS view
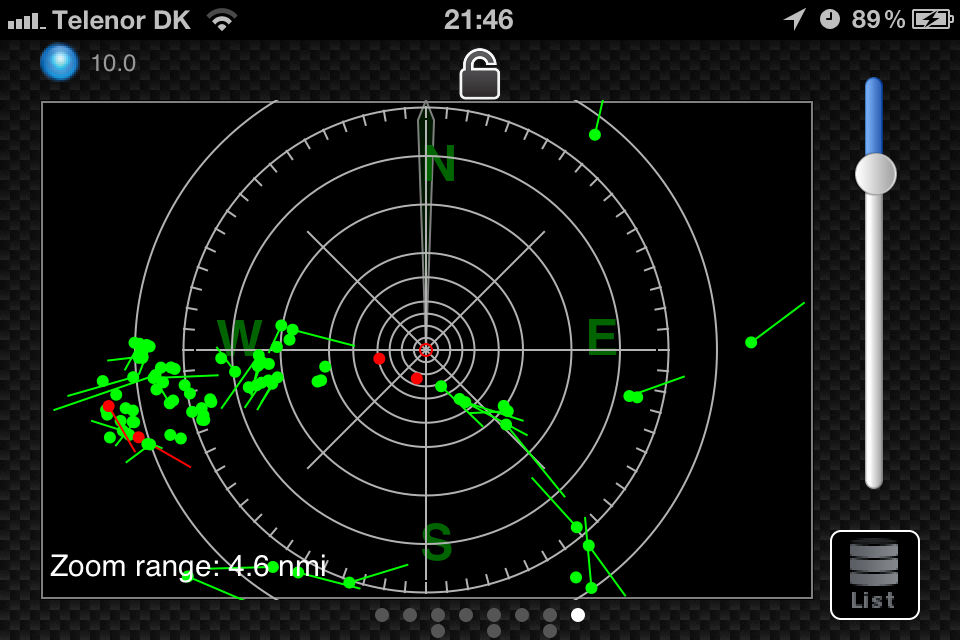
If you get AIS data as NMEA sentences via WiFi, iRegatta can show you a “AIS radar”.
Your current position will be in the middle of the radar, with a line indicating you
direction and speed.
All other boats have a line indicating it’s course. The length of the line depends on the
speed of the vessel.
In iRegatta setting you can specify how frequent CPA (Closest Point of Approach) and
TCPA (Time to Closest Point of Approach) should be calculated. In case you have many
AIS vessels in your list, CPA calculations can be CPU consuming, so in case you don’t
need it, set it to “never”.
If CPA/TCPA is calculated, vessels with a CPA less than 1 nautical mile will show up in
red.
If you tap on any of the vessels in the “radar”, an pop-up will show you some vessel
information.
For information on all vessels reported via you AIS receiver, tap the “List” button.iRegatta In-App purchases
iRegatta Pro is the original version of iRegatta. It includes all basic functionallity,NMEA
input and AIS input. As the number of features in iRegatta grew, it seemed unfair for all
users to pay for features they may never use - that's when iRegatta was launched. iRegatta
works for free in 4 minutes, letting everybody test it without having to pay anything, but if
you want to use it for real, you can unlock the features you need by In-App Purchases.iRegatta Basic
This is included in iRegatta Pro. It gives you all the basic functionallity of iRegatta,
working with the internal GPS. This includes waypoint/route navigation, layline tool, lift
and performance indicators, startline tool, usage of polar diagrams etc.iRegatta NMEA
This is included in iRegatta Pro. This will give you the option of receiving NMEA data as
input for iRegatta. With live wind data, iRegatta will deliver more accurate performance
and layline information.iRegatta AIS
This is included in iRegatta Pro. This will give you the option of receiving AIS data as
NMEA input, and show you the traffic in a radar like view.! !Pebble integration
Starting from version 3.20.0, iRegatta is able to integrate with the Pebble smartwatch.
It will require an In-App purchase in iRegatta to enable Pebble integration.
For iRegatta to be able to communicate with the Pebble watch, you need to pair your
Pebble with your smartphone/tablet and run the official Pebble App on the smartphone/
tablet before starting iRegatta.
The first time you start iRegatta after connecting with your Pebble, an iRegatta Watch app
need to be loaded onto your Pebble. In iRegatta tap the “Pebble” button on the help view
(left most view). A new view will show, explaining the Pebble set-up. Tap the “Import”
button to download the watch app from the internet and upload it to your Pebble. After
this you have an iRegatta Watch App on your Pebble, that you need to start to interact
with iRegatta on your smartphone/tablet.
The “Pebble” button in the help view works as a toggle button (just like the tracking
button in the navigation view). Long tap it for more than 2 seconds to turn on/off Pebble
communication. When the button is green, iRegatta communicates with Pebble, else it’s
red.
In the upper left corner of iRegatta, right next to the GPS quality indicator, a small Pebble
icon will show up if iRegatta is connected to a Pebble Smartwatch. If the connection is lost
while iRegatta is running (maybe if the Pebble is out of range), Pebble communication will
turn off. Even if the Pebble gets back into range, Pebble communication will not
automatically turn on – you need to do that manually in the help view.
If a Pebble is detected at startup, iRegatta will automatically ask you if you want to turn
on Pebble communication.
It’s considered best practice not to communicate with the Pebble unless the user requests
this – that’s why iRegatta doesn’t just connect automatically in the background.
On your Pebble you have 4 views in the iRegatta App.
Race View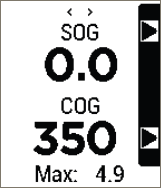
In this view you’ve got your basic race information:- Lift indicator
- Speed over ground
- Course over ground
- Max Speed
These data are updated once a second – but Pebble
communication may be a little slow (especially on some
older Android devices), so there might be a delay in data
update.
By pushing the upper or lower right buttons on your Pebble,
the readouts will change. It’ll go through all the readouts you
have available in iRegatta’s race view.
Start View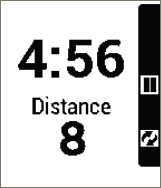
In this view, you’ll be able to control the countdown feature
of iRegatta. You can start, pause, sync and reset the
countdown using the buttons of the Pebble. Your button
press actions are transmitted to iRegatta, and are handled as
if you were tapping the buttons in iRegatta.
iRegatta transmits the count down time and distance to line
back to the Pebble, so unfortunately you might have a little
delay in clock update, especially on older less powerful
smartphones/tablets. Pebble will continue counting down
every second, so even if the data from your smartphone
doesn’t arrive, you won’t experience a clock that doesn’t
count down.
You can’t set a start time for a “pursuit start” directly from the Pebble, but if set in
iRegatta, you can still get the count down time shown on the Pebble.
Start Line View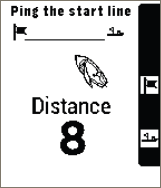
In the Start Line View you can mark the boat and pin end of
the starting line using the Pebble buttons. Like in the Start
View, you’ll also get a Distance To Line back from iRegatta.
View Selector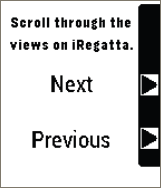
From this view you can control which view is shown on your
smartphone or tablet.
The views in iRegatta will “swipe” one page forward or
backward, depending on the buttons you press on your
Pebble.Post Race Analysis
With this in-App purchase you'll be able to analyse your racing if you have tracked it.
Based on tracked wind information and position/course and speed, iRegatta will split
your track into up and down wind legs, and each leg will be devided into starboard and
port tacks.
If you use the start line tool, the start line and start time will be included in the track, and
the analyzed part of the track will be trimmed to the time of the start. In your race analysis
you'll see how many seconds after the gun you crossed the line, and what your distance to
the line was, as the gun went off.
For each leg you can get information about duration, average performance compared to
your polar, and number of tacks and jibes on that leg.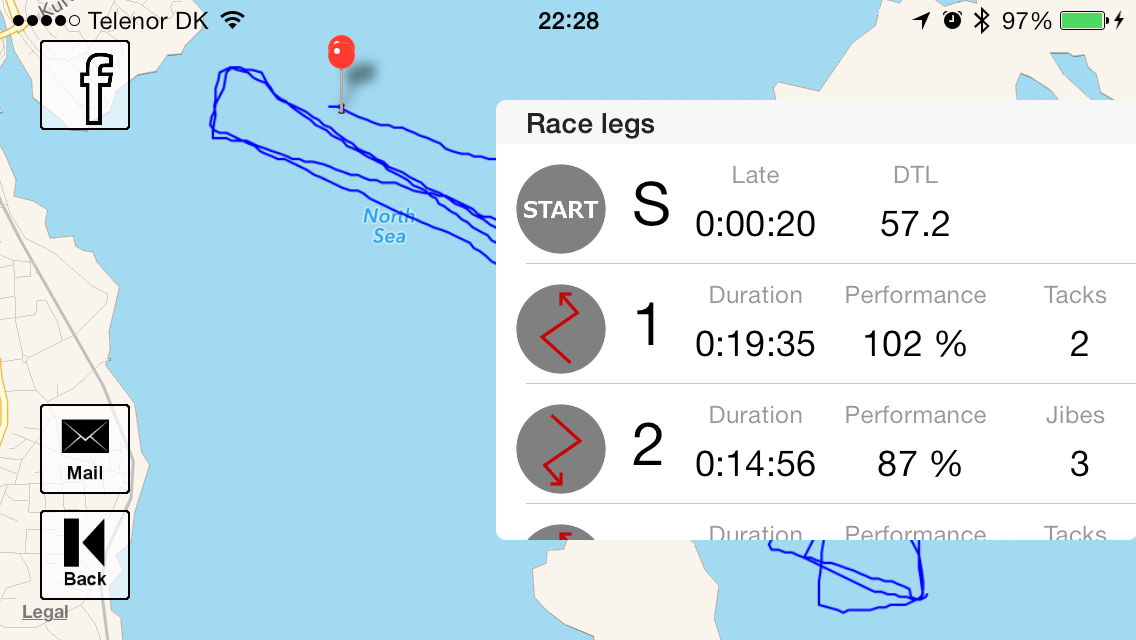
For each tack you can get information about duration, average performance compared to
your polar, average speed and wind speed.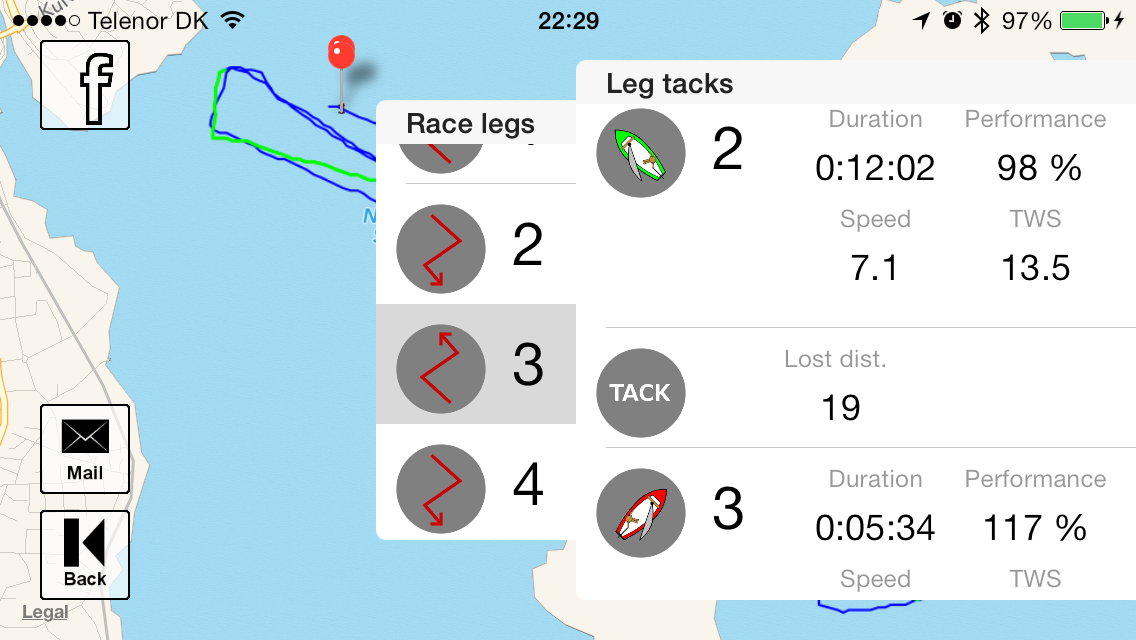
Each tack and jibe can allso be analysed in detail, showing you the distance lost during the
maneuver. iRegatta calculates where you would have been 30 seconds after the maneuver, if you
would have continued with the same course and speed you had 30 seconds prior to the maneuver, and
compares it to where you actually where 30 seconds after the maneuver.
In case the tack before or after the maneuver was shorter than 1 minute, iRegatta will use
position, course and speed from the middle of that leg instead of 30 seconds before/after
the maneuver.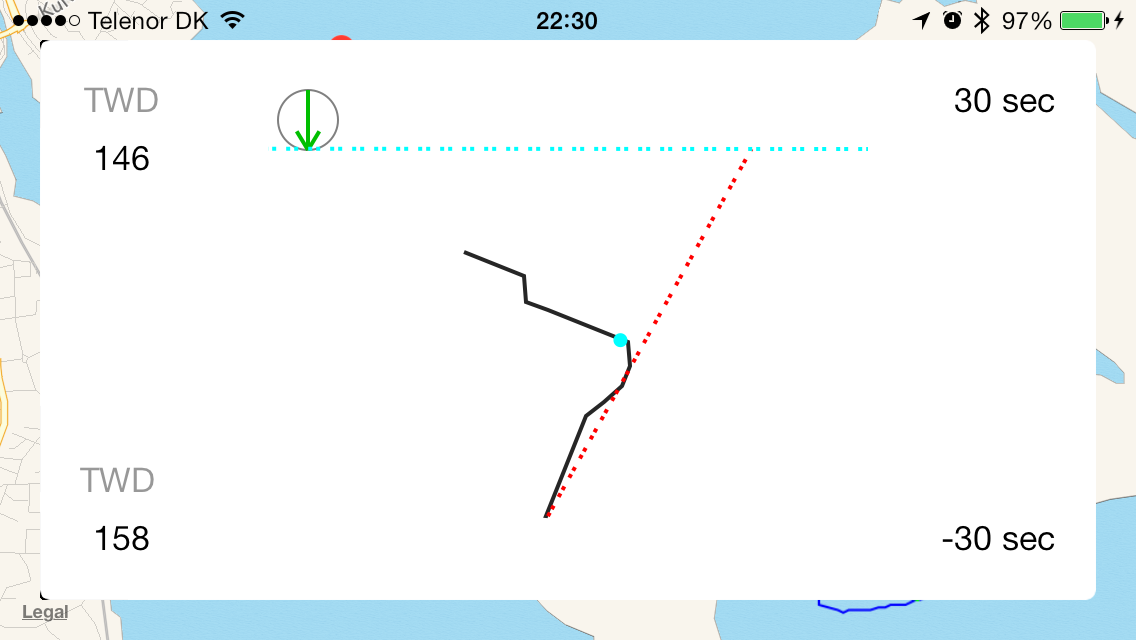
So pay attention to the number of seconds displayed to the right of the maneuver graph -
shorter time may lead to a less trustworthy analysis.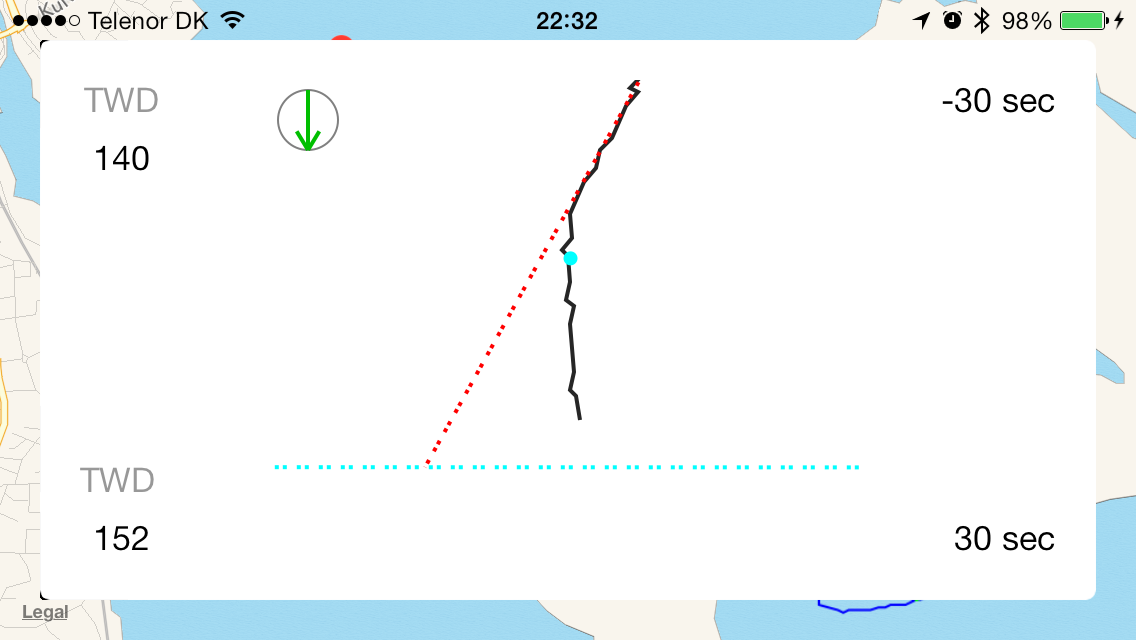
If you have run an analysis before exporting the track, a Post Race Analysis summery will
be included in the track export mail.Sailplan
This In-App-Purchase will make iRegatta suggest which sails you should use in the current conditions, and if
navigating a route, it'll also tell you which sail you should use on the next leg, so you can prepare for sail shifts.This of cause only works if you have a seperate polar file for all your available sail combinations.
How it works
Every 5 seconds iRegatta checks all the polars you've got available for import, and calculates which on has the
highest speed for the current TWA and TWS. If that polar is different from your current polar, the "Sailplan" button
in the lower left corner will change to green.If you tap the button, a view will popup showing you the current polar, a suggested polar and a suggested polar for
the next leg. Tap the import button, and the polar will load (and you should shift your sails to match it).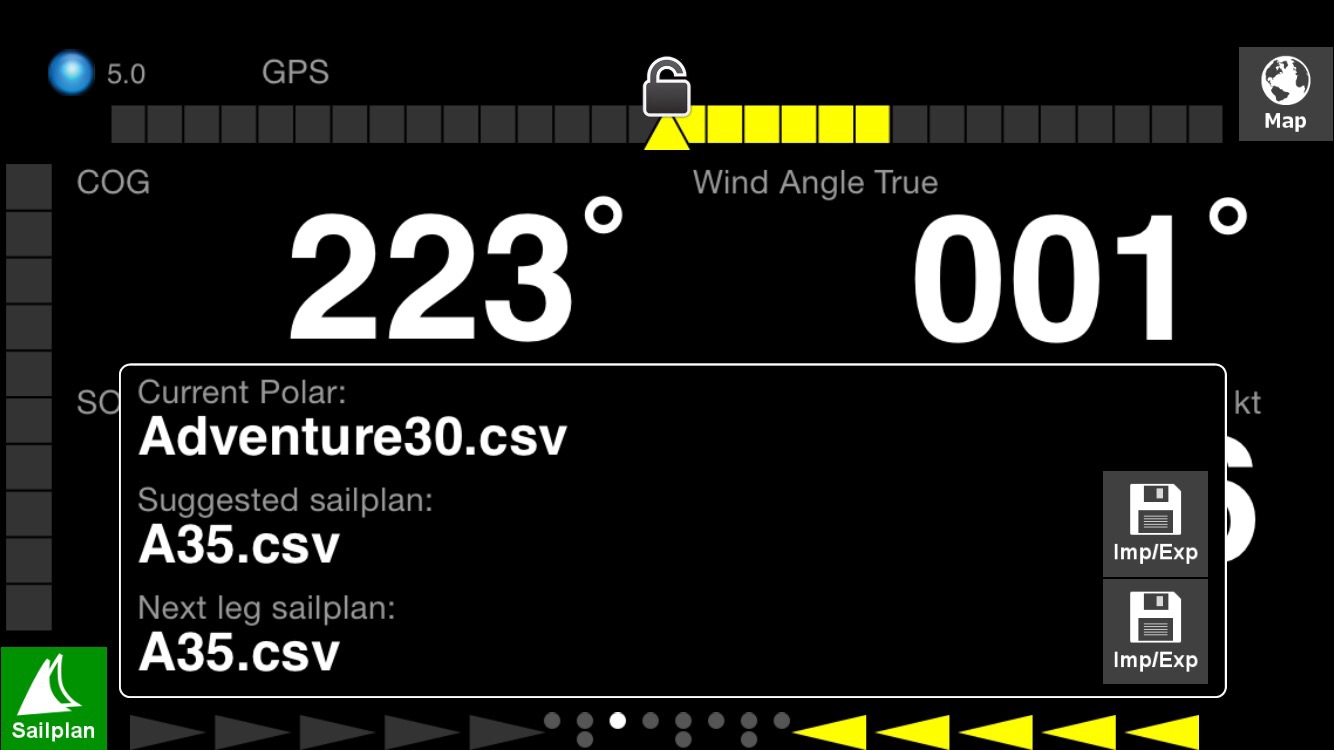
Things to consider when creating your polars
For this to work properly, you need to be carefull how your polar files look. If you foreinstance have a polar file for main+jib
and another for main+jib+spinnacker, the latter should only have values for the TWA's where the spinnacker is hoisted, else
that polar could also be choosen for upwind, which wouldn't make sense.NMEA setup
For iRegatta to receive NMEA data, you need to setup the communication with your
NMEA streaming device.
First you need to connect and startup your NMEA hardware. This hardware should
establish a WiFi network that your Android device can connect to.
In the Android setting you need to find that network and connect to it.
After that you have to go into the iRegatta settings and set up NMEA input. First setting
you need to adjust is setting the “WiFi instrument data” to “ON”.
Choose if your hardware if transmitting by using the TCP or UDP protocol.
In case you are using the TCP protocol, you have to type in the “IP address” and “Port
no.” of the transmitting device.
If you are using the UDP protocol, you only need to type in the “Port no.” of the
transmitting device - you can ignore to “IP address” setting.
On Android you can also connect using a Bluetooth connection. Pair your device with the
bluetooth NMEA transmitting device, and select it in iRegattas settings.Bluetooth Low Energy setup
iRegatta can also receive wind speed and direction from Bluetooth Low Energy anemometers.
Currently iRegatta supports CUPS 4.0 from Calypso Marine Instruments.
You'll need an Android device with BTLE capabilities and Android 4.3 or higher, and iRegatta Pro or the NMEA In-App purchase.
Tap the BTLE button in the Help View, to start the scan for devices.
Select the wind Anemometer in the list that pops up to connect.If the connection is successful, the "BTLE" button will turn green and wind data should
arrive in the NMEA view.If the BTLE device was connected when iRegatta was closed, iRegatta will automatically try to reconnect
when restarted.To close the connection, tap the "BTLE" button again and exit the list view with the "Cancel" button
Calculations
Here’s an overview of how values are calculated and handled in iRegatta.Lift indicator
This will show you if your current heading is different from your average heading over
the last 10 seconds.Damping
A damping of 3 seconds means that instead of the last heading or speed value, an average
of the heading or speed of the last 3 seconds is displayed.Performance
Performance percentage is calculated by comparing your current speed to the
corresponding polar. If your polar for the current wind speed for instance says 5 knots and
you are only doing 4.5 knots, performance would be 90%.VMG
If navigating towards a waypoint, VMG is calculated with respect to the bearing to that
waypoint. If not navigating, VMG is calculated using the current wind direction.Distance to line
The distance to line, is the distance measured from your current location and
perpendicular to the line and it’s extensions.Time to line
Time to line is calculated by comparing the distance to line with how much you’ve been
closing in on the line over the last 10 seconds. This means that as long you are aiming at
the starting line and moving at constant speed and course, the numbers are valid.True Wind
NMEA True wind direction and speed is calculated from NMEA compass heading and
NMEA speed through water. In case these informations are not available, Course over
ground (GPS) and Speed Over Ground (GPS) is used instead.NMEA sentences
The following NMEA sentences are recognized by iRegatta://RMC - recommended minimum data for gps
//GGA - Global Positioning System Fix Data
//GLL - Geographic Position - Latitude/Longitude
//VTG - Track made good and Ground speed
//HDT - Heading - True
//HDG - Heading - Deviation & Variation
//HDM - Heading - Magnetic
//MTW - Mean Temperature of Water
//DBK - Depth Below Keel
//DBS - Depth Below Surface
//DBT - Depth Below Transduser
//DPT - Depth of Water
//VHW - Water speed and heading
//MWV - Wind Speed and Angle
//VWR - Relative Wind Speed and Angle
//BWC - Bearing & Distance to Waypoint - Geat Circle
//RMB - Recommended Minimum Navigation Information
//XDR - Pitch and Roll data
//WPT - import Waypoint - Type it into the wind direction text field.